Creating Access
Accommodations, Accessible Design, and Pedagogy
* * *
What is the Accessibility Subcommittee?
- We are a subcommittee of the Faculty Senate Environment, Quality of Life, and Disabilities Committee. We began meeting in Spring 2019, in response to concerns about accessibility issues on campus.
- Our purpose is to build faculty awareness of existing college policies and procedures related to accessibility and course design in consultation with appropriate college offices and governance entities, and to raise awareness on campus about accessibility.
- We work in conjunction with the Center for Excellence in Teaching and Learning (CETL), Services for Students with Disabilities (SSD), CUNY Assistive Technology Services (CATS), and CUNY Media Accessibility Project (MAP), to promote support for faculty as they improve accessibility in their courses.
Who is responsible to determining accommodations for students with disabilities?
Services for Students with Disabilities
Science Building, S-132
718-631-6257
The philosophy and mission of Services for Students with Disabilities (SSD) is "to facilitate the academic success of students with disabilities through the provision of appropriate educational supports and settings while nurturing personal development." This commitment is consistent with the guidelines set forth by the Section 504 of the Rehabilitation Act of 1973, the Americans with Disabilities Act (ADA) of 1990, and the ADA Amendments Act of 2008 (P.L. 110-325).
SSD determines and makes arrangement for accommodations for students with disabilities in order to ensure compliance with federal education and disability law.
SSD should be your first contact if you have questions about providing accommodations.
Who are CATS and MAP?
CUNY Assistive Technology Services (CATS) and Media Accessibility Project (MAP) are adaptive technology specialists who provide assistance with adaptive technology and creating accessibility in online courses, document design, and classroom environments.
They provide helpful information about accessibility issues on their blog.
CATS also offers a self-paced online course that introduces faculty to Universal Design for Learning (UDL) and making courses accessible. The course is available in Blackboard.
How do I access the CATS Self-Paced Accessibility and Universal Design for Learning Workshop?
CATS has developed a self-paced course on accessibility and Universal Design for Learning (UDL) for faculty. The course is delivered via Blackboard. All faculty members can enroll in the course.
A certificate and badge are awarded following successful completion of the course.
To access the course, log on to Blackboard, and click on the words Accessibility Training, found on the blue bar at the top of your screen.

Enrolling in the Accessibility Course on Blackboard

Once you enter the Accessibility Training menu, click on the course link to enroll in the course. The course link is located on the left side of your screen in the Blackboard Accessibility Course text box.
Accessibility and UDL Workshop Home Page
After you enroll in the course, you will be able to access the course page in Blackboard. You can work through the topics at your own pace by accessing them from the menu on the left side of your course page.

Now that everything has moved online, are there special considerations for making my classes accessible?
Yes and no.
Faculty should always make sure that documents posted online are accessible to students using screen reading technology. Faculty should always make sure that pre-recorded videos are captioned for students who require captioning. This is true whether classes are online, hybrid, or face-to-face.
However, the reality is that right now, information is being delivered to students exclusively in an online format, so accessibility is more important than ever.
Where do I start?
Check documents created in the Microsoft suite of products for accessibility using the Accessibility Checker.
Check PDFs for accessibility using Adobe Acrobat Pro.
Learn to create Test Exceptions in Blackboard for students who need extended time on tests.
Make sure that pre-recorded videos (like lectures) and videos recorded and made available for students to access later (like discussions in Collaborate) are captioned.
Checking for Accessibility in Microsoft Office Products
- Microsoft Office products have a built-in tool to assess a document's accessibility, called Accessibility Checker.
- Accessibility Checker inspects a document and suggests corrections for issues that affect accessibility.
- Accessibility checker is found under by selecting:
File > Info > Check for Issues > Check Accessibility
- Accessibility checker is found under by selecting:
Checking for Issues on Microsoft's Products

Creating Accessible Microsoft Word Documents
Your document should be accessible to everyone, especially for people who use assistive devices. The following are some key components on how to make your document more accessible within Microsoft Word.
Headings and Titles
Headings create a hierarchy in the document that a screen reader can follow.
- To create a heading:
Home tab > Styles pane
Set a default document title for a screen reader to be able to scan and read out loud to its user.
- To set a default document title:
File > Properties > Summary > Title field > Type title there
Hyperlinks
Hyperlinks need to have a clearly defined label of the destination of the link so that a screen reader can read them out loud when scanning the document. To create a hyperlink:
- Check that the link is hyperlinked (with either http or https in the beginning of the link)
- Select the hyperlink and select hyperlink in the dropdown menu that opens.
- The "Insert Hyperlink" dialogue box will open, move to change the text in the "text to display" field to a more descriptive title.
Tables
Tables should not be used to layout or style content on a page. Tables need to have clear structures and headers in order to be scanned by a screen reader. The simpler the table the easier it is for a screen reader user to scan them. Header information cannot be identified by screen readers, which makes it difficult for a user to know the table information if the table is not well structured. To create a table header:
- Insert tab > Insert Table > Table Layout > Repeat Header Rows
Preview of Insert Tab

Preview of Layout Tab, followed by Repeat Header Rows

Alt Text
Alt Text allows the screen reader to scan a description of tables, figures, or images that may be on the document.
- Alt Text for Images, Clip-art, figures, etc. allows a screen reader to scan a description of the visual and state what is important about it a person who may not be able to see. To add alt text to an image:
- Select the image > Format Picture > Layout & Properties > Alt Text > Input alt text
- Make sure add alt text in the Description field, not the Title field.
- Alt Text for Tables. The simpler the table, the easier a screen reader can scan it. To add alt text to a table:
- Select table > Table Properties > Alt Text > Input text in the Description field.
- Make sure to add alt text in the Description field, not the Title field.
Lists
- Use the different lists styles that Microsoft provides as it allows the screen reader to easily scan the document. In order to use the styles provided:
- Choose from the bulleted and numbered lists provided in the Paragraph section of the Home tab found in the main software ribbon.
Color Contrast
- Do not use color to convey information, and make sure to use colors that will allow the user to read the font. Please avoid bright colors on a white/light background.
- Use the Colour Contrast Analyser to check the document's color contrast.
Things to Look out For
- Don't use font smaller than 12pt
- Make sure there is sufficient color contrast
- Don't strictly use color to convey information
- For longer documents provide a table of contents
- Make sure to use the avaliable style and formatting tools provided within the program.
Accessibility in Adobe Acrobat Pro (for PDFs)
- Your document should be accessible to everyone, especially for people who use assistive devices. The following are some key components on how to make your document more accessible within Adobe Acrobat Pro.
- "Acrobat tools make it easy to create accessible PDFs and check the accessibility of existing PDFs. You can create PDFs to meet common accessibility standards" (https://helpx.adobe.com/acrobat/using/create-verify-pdf-accessibility.html).
- Please note that the Accessibility Checker is only available in the Pro version of Adobe Acrobat. Please consult with IT to get a license for this product.
Accessibility Check in Adobe Acrobat Pro
- Adobe Acrobat Pro has a built-in tool to assess a document's accessibility.
- Scanning for accessibility inspects a document and suggests corrections for issues that affect accessibility.
- To run the scan:
Choose Tools > Accessibility
The Accessibility toolset is displayed in the secondary toolbar.
In the secondary toolbar, click Full Check.
The Accessibility Checker Options dialog box is displayed.
You may also access the Accessibility menu through the Tools menu on the right side of the screen
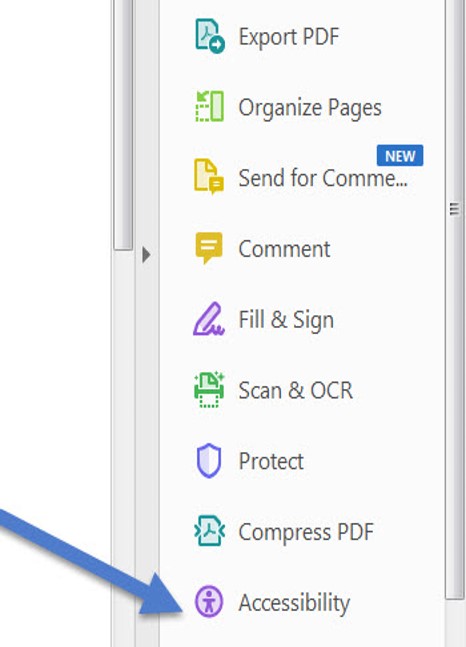
This menu will offer a variety of options for checking the accessibility of a document. Full Check will check the widest range of criteria
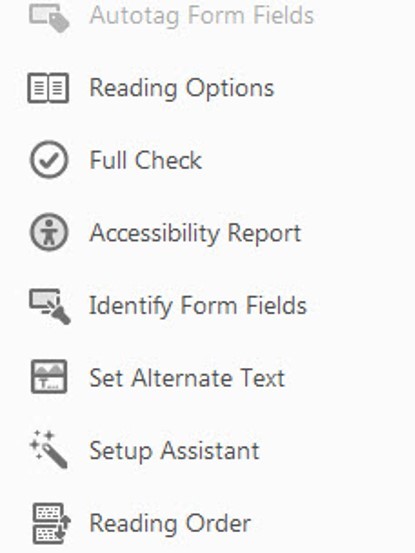
Adobe's website offers full directions on how to respond to the results from the Accessibility check
Creating an Assessment Exception for Extended Time on Blackboard
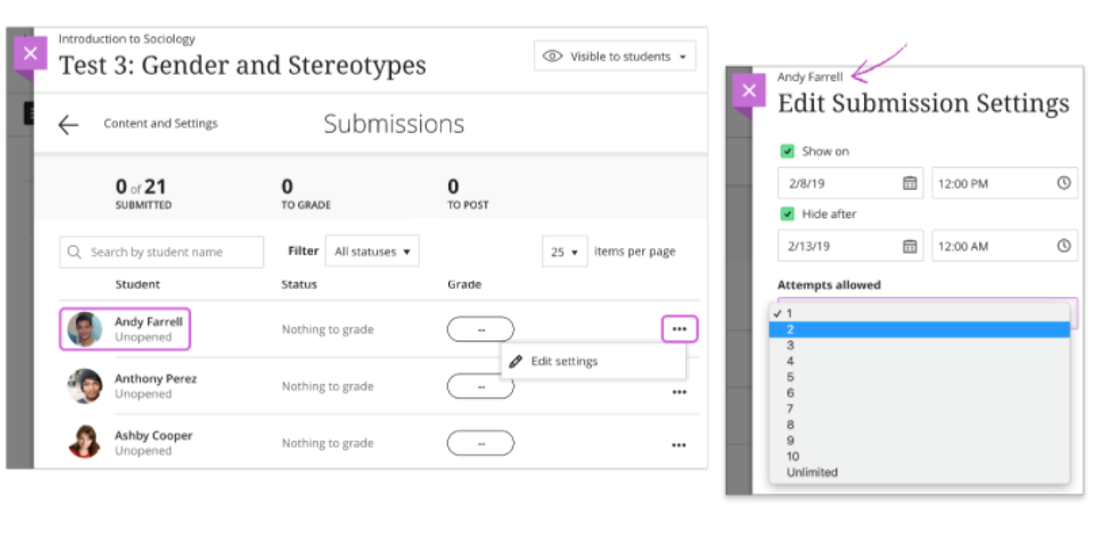
- From an assessment's Submissions page, you can add exceptions for students individually. You can also add exceptions from a student or a group's individual submission page. You can't add an exception for an anonymously graded assessment.
- From an assessment's Submissions page
- From an assessment's Submissions page, open the menu in a student's row and select Edit settings. The Edit Submission Settings panel opens.
- You can change the Show on and Hide after dates and times and allow additional attempts.
- You can't save until you make a change to the settings. If you don't want to make any changes, select Cancel to close the panel.
Editing Submissions
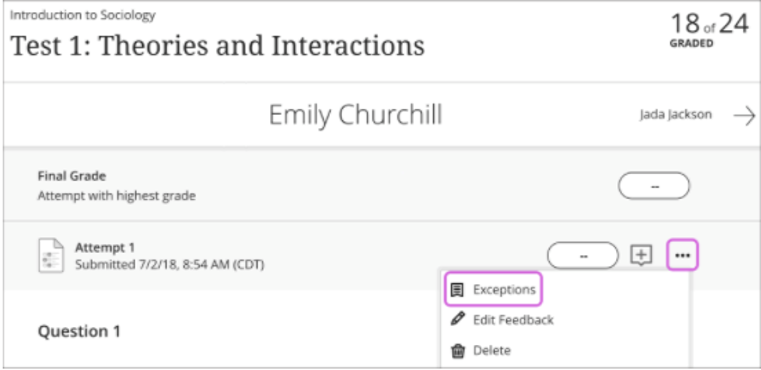
Extending Time from an Individual Submission
From a student or group's submission page, open the menu next to the grade pill and select Exceptions. The Edit Submission Settings panel opens.
Extending Time after Assigned Test Time
- If you've hidden content after a certain date and time, you can extend the access for an individual student. For example, "Test 1" is hidden today after 10 AM. A student has internet issues, so you extend the access for just that student to 6 PM. However, if the due date is also at 10 AM, the submission is still marked late in the gradebook.
- In the activity stream, the student is notified about the available test, but the extended access period isn't listed in the stream or with the test. You'll need to inform the student about the length of the extended access period. You'll also need to notify students individually when you allow additional attempts.
Exception Icon
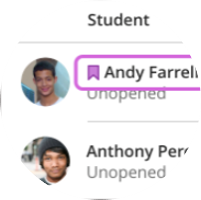
- After you allow an exception for a student's assessment, you'll see an icon next to the student's name. The assessment exception icon is the same icon that appears for accommodations. If a student has an accommodation and an exception for an assessment, only one icon appears.
What is the requirement for captioning?
If the recording is an alternative for material that is already in written format, then captioning is not required. For example, if faculty also make avaliable PowerPoint slides or lecture notes that provide all of the same information available in the recording, captioning is not required.
However, if the verbal presentation provides substantive explanation of the available written material, so that the information is not available in written format, then captioning must be provided.
Faculty should review the Web Content Accessibility Guidelines.
How do I create captions?
There are several options, depending on the platform you are using to record captions.
Youtube
If you are uploading pre-recorded lectures to Youtube, Youtube generates automatic captioning. However, the accuracy varies widely. The best practice is to create recordings that include only one vice, have no background music or background noise. It is ideal to use a microphone and headset to record lectures.
After uploading the lecture, faculty should play the lecture back to make sure that the captions generated are accurate. If they are not, faculty should edit the captioning.
What are options for captioning in other instructional platforms?
Webex, Collaborate, and Zoom all offer different forms of captioning.
Both Webex and Collaborate require instructors to assign captioners to create captions. Instructors can be the assigned captioner. Guidelines for creating these captions can be found on the companies' websites.
While captioning in Zoom must also be done manually, Zoom will automatically generate an editable audio transcript of recordings made using Zoom.
At this time, Zoom is not supported by QCC as a platform for conducting classes online.
If I don't use any of these platforms, are there other options for captioning and transcribing my video or audio content?
Does the Accessibility Committee offer other support for faculty who want to improve accessibility in their classes?
The Accessibility Subcommittee, in concert with CETL and the Academic Development Committee, hopes to complement the work of SSD and CATS by creating awareness of and opportunities to learn about teaching strategies for students with disabilities, and to create connections between QCC faculty members who are working on this field of the scholarship of teaching and learning.
Due to the New York State Pause in reaction to the COVID-19 pandemic, the following planned events were postponed. The Accessibility Subcommittee will provide updates on the rescheduling of these events.
- Accessibility Committee Presentaton, Faculty Executive Committee Meeting
- Universal Design for Learning Workshop Series, planned in conjunction with CETL